


Yosemite Day Hikes
NAVIGATE THIS GUIDE
—————————————
Yosemite Valley Hikes:
- Vernal & Nevada Falls via the Mist Trail
- Yosemite Valley to Glacier Point
North of the Valley:
South of the Valley:
Index of Yosemite Day Hikes
Researching Hikes: Where to Start
Our Top Picks - You’ll find our top picks for day hikes in Yosemite Valley, North of the Valley and South of the Valley in the sections below.
Everything Else - Of course, that’s just a curated handful of options. To cover everything else, here's a great place to supplement your Yosemite hiking research. This guy's website is amazing--he includes a full index of Yosemite National Park day hikes, broken down by distance, crowd factor, level of scenery and difficulty:
Our Picks: Best Hikes in Yosemite Valley
Upper Yosemite Falls
Summary - One of the best views of Yosemite Valley, as long as you don't mind hiking straight up.
Distance - 7.6 miles round trip from the trailhead to the top of the falls; 9.4 miles including Yosemite Point
Elevation Gain - 2,559 ft. from the trailhead to the top of the falls; 2,969 ft. to Yosemite Point
Seasonal Timing - The most popular time to visit is spring or early summer when water flow over the falls is at its peak, but the crowd level is going to be the highest as well. Want a little more peace & solitude? Try late October/early November (see photos below) or early spring. The weather was great, the falls were spectacular, we had the place to ourselves, and the beautiful view of the Yosemite Valley included the snow-capped peaks you see in the background.
Stay Safe - Yosemite unfortunately sees around 12 deaths within the park every year, and the top areas of these waterfalls are consistently the most common culprits. The witness accounts are horrifying if you read them. With such strong currents, usually a person slipping and falling in the water upstream from the falls is all it takes.
What to bring - Regular day hiking gear, plus microspikes or crampons if hiking in early spring or late fall; crampons in the winter (assuming the trail is open)
Resources
NPS.gov - Yosemite Falls Trail Overview
YosemiteHIkes - Upper Yosemite Falls Hiking Guide
EarthTrekkers - HIking to Upper Yosemite Falls (Great Photos)
Yosemite Valley Floor to Glacier Point via Four-Mile Trail
Summary - An absolute classic Yosemite Valley hike that starts from the valley floor and climbs straight up the canyon walls with picturesque scenery every step of the way. The summit offers an unbeatable panoramic view of Half Dome, El Capitan and the entire valley floor. With 3,200 ft. elevation gain & loss over a 10 mile stretch, this is no casual stroll in the (national) park. Get ready for a solid physical challenge. That said, it’s worth every step.
Distance - 4.8 mi one way to Glacier Point; 9.6 mi round trip
Elevation Gain - 3,200 ft. from the valley floor to Glacier Point
Seasonal Timing - Just about any time of year works for this one--when is a well-earned panoramic view of Yosemite Valley not great? Like Yosemite Falls, you'll encounter higher crowds in late spring and early summer. Referencing the photos below, come prepared for snow if you're hiking between October and March.
What to bring - Pack only the essentials—ounces tend to feel like pounds on a 3,200 ft. tall hike. Definitely bring microspikes or crampons if hiking in early spring or late fall when there could be snow on the trail.
Resources
NPS.gov - Four-Mile Trail Overview
YosemiteHikes - Four-Mile Trail Hiking Guide
Traveler Ted - Hiking Yosemite’s Four-Mile Trail in Winter
Vernal and Nevada Falls via the Mist Trail
Summary - Two of the most powerful waterfalls you’ll ever see in your life are hidden on a short hike to the back end of Half Dome in Yosemite Valley. Each towering several hundred feet tall (317 & 594 ft., respectively), you can humbly stare at the water raging off the edge of these falls for hours.
My best advice for this hike—these falls draw really heavy crowds during regular hours due to their sheer beauty and short hike from the valley. With its steep, narrow steps and slick terrain around the falls, you’ll find it truly obnoxious if you’re looking for any kind of adventure or serenity. Stay away from the zoo at all costs—time your visit as close to sunrise or sunset as possible or simply visit outside of peak season.
Distance - 1.6 miles round trip to the Vernal Fall Footbridge (1.5 hrs)
2.4 miles round trip to the top of Vernal Fall (3 hrs)
5.4 miles round trip to the top of Nevada Fall (5-6 hrs)
Elevation Gain - 1,000 ft. to the top of top of Vernal Fall; 2,000 ft. to the top of Nevada Fall.
Seasonal Timing - While both waterfalls are open year-around, the route changes seasonally for safety concerns during the winter. Specifically, the lower section of the Mist Trail passing Vernal Fall closes due to risk of falling ice and rock, while the upper portion of the John Muir Trail closes to keep people safe from dangerous icy conditions. You’ll end up taking the JMT on the lower half of the hike passing Vernal Fall and the Mist Trail on the upper half to reach Nevada Fall. The trail is well marked, but you can find detailed maps and trail info on the winter route here.
Options for Completing the Hike - During the summer, hikers can turn this hike into a loop to add variety and avoid the crowds. I’d recommend taking the Mist trail on the way up and the JMT via Clark Point heading back. Click here for a map with detailed trail info.
Stay Safe (Seriously) - I’ve never seen a hike that causes more deaths per year than the top area of Nevada Fall. Almost 100% of the time, these fatalities are caused by people jumping over the guardrail to take photos. Sadly most of these cases aren’t even people near the edge—they slip on the smooth granite near the water and fall in. Once in the water, the current is too strong to overcome—people are swept over the falls in seconds. Do not ignore the signs and barriers on this hike.
Mammoth Times - How Three Hikers at Vernal Fall in Yosemite Tumbled to Their Deaths
NBC Bay Area - Waterfall Victims Hugged Tightly as They Went Over the Edge
What to Pack - Bring a waterproof jacket if you don’t want to get wet. They don’t call it the Mist Trail for nothin’. You’ll also want a generous supply of water, especially if you plan on hiking any further than Nevada Fall. The last water station is at the Vernal Fall footbridge, roughly one mile from the trailhead.
Resources
NPS.gov - Vernal Fall and Nevada Fall Trails
HIkespeak.com - The Mist Trail to Vernal Fall and Nevada Fall
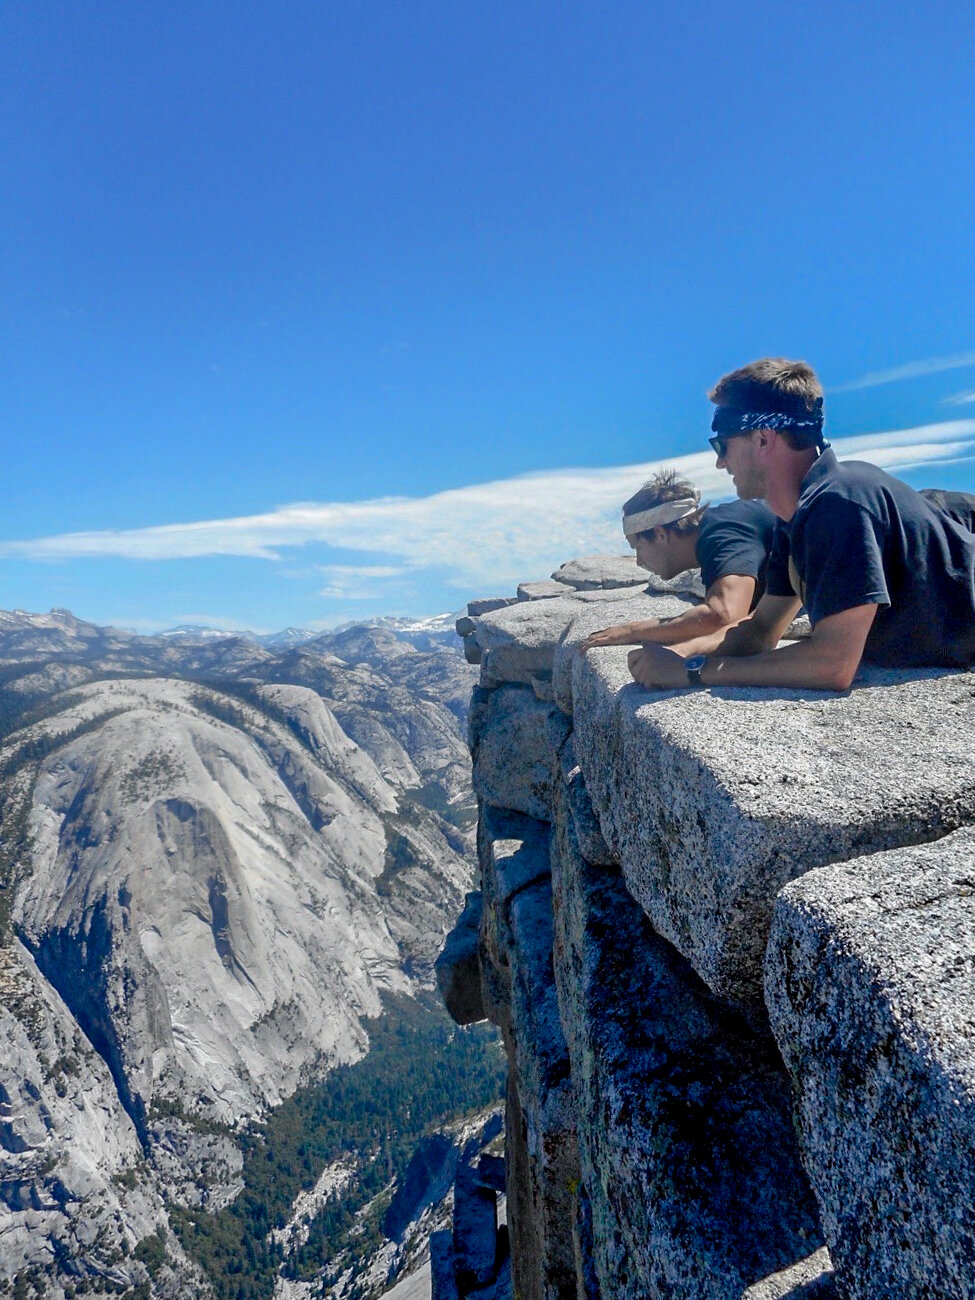
Half Dome
Summary - Hiking Half Dome is a lifetime bucket list hike that every outdoor adventurer should have at the top of his/her list. The views will leave you as breathless as the elevation. And wow…the adrenaline rush of those famous (or infamous) cables feels like gravity grabbing you by the collar and slapping you in the face—like a shocking but much needed reminder to live life to its fullest! Words can’t describe the thrill, beauty and physical challenge of this experience, making Half Dome possibly my favorite hike of all time!
That said, be ready for this challenge! This 14 mile trek feels a lot more like 25, because you’ll be climbing three Empire State Buildings worth of stairs at high elevation in the process.
If you're active and in good shape, you can complete it without much training, but you'll be sore for a week. If you’re not an experienced hiker, I wouldn’t recommend taking on this behemoth slab of granite without training.
Distance - 14.2 miles round trip via the Mist Trail (primary route from the Yosemite Valley floor)
16.5 miles round trip via John Muir Trail
20 miles round trip via Glacier Point
23 miles round trip via Tenaya Lake
7 miles round trip from Little Yosemite Valley campground
Elevation - 4,842 ft. net elevation gain (4,000 - 8,842 ft.)
When to Plan Your Hike - Due to the danger of this hike during extreme weather conditions, the cables section to the summit is not open year around. This year they're scheduled to be up from May 25 - Oct. 9, 2018, but these dates could change based on conditions.
In general the cables are nothing to mess with during sketchy conditions--one slip and you're gone. Don't go when temperatures are below freezing. Don't go if there's risk of a lightning storm. Use your best judgment with rain...granite gets really slick when it's wet.
The Preseason Permit Lottery - A limit of 300 hikers are allowed each day on the Half Dome Trail (225 day hikers and 75 backpackers). Of each day's quota, between 225-250 permits are awarded through the preseason lottery system--by far the most reliable way to plan for this hike. The lottery is held once a year for that entire remaining year. Applications are accepted March 1-31; lottery winners are selected in mid April; the trail itself usually opens in mid to late May.
Complete your Half Dome preseason lottery application here.
Note: Your chances of winning the lottery for this hike are much better if you aim for a weekday instead of a weekend. Both times I've hiked this trail, our organizers were smart enough to apply for Monday permits. Both of them won on their first attempts. Hikers only had to take one day off work, and we had the entire weekend leading up to the hike to explore other areas of the park (check out: Half Dome Permit Lottery Statistics).
The Daily Permit Lottery - In addition to the preseason lottery, roughly 50 permits are awarded each day through a separate daily lottery during hiking season. The daily lotteries have an application period two days prior to the hiking date with a notification late that night. For example: to hike on Saturday, you would apply between 12:01am - 1pm PT on Thursday and receive an email notification of results late on Thursday night.
Complete your Half Dome daily lottery application here.
Options for Completing the Hike
Option 1 - Do the entire 14 mile hike in one day (most common).
The advantage to this option: if all you have is a day hiking pack, your load is going to be a lot lighter on the first four miles of the hike, a section with high elevation gain. The campground for this hike, Little Yosemite Valley, is 2,100 ft. above the valley floor.
Option 2 - Split the hike up into two days (additional wilderness camping permit required).
With this option, you’d backpack up to Little Yosemite Valley camp on Day 1, which is about halfway to the summit. Head for the summit early on Day 2, return to camp and haul your gear back down the finish line.
In addition to splitting this difficult hike up into two days, the BIG advantage is that you'll have a head start on the morning of the hike, beating the single-day hikers to the top and giving you more room on the cables. The biggest downside is carrying a 40 lb. pack up the steep steps of Vernal and Nevada Falls.
Option 3 - Plan a multi-day backpacking trip on this leg of the John Muir Trail (additional wilderness camping permit required).
The permit office usually leaves a handful of Half Dome permits open for backpackers on this route. This is the only plan-ahead method I know of that allows you to bypass the park’s crowded lottery system if you're initially denied a day permit.
What to Pack
Your Permits - Every single day, a Yosemite ranger hikes to the base of the cables section of Half Dome to check hikers’ permits. He/she will turn you around if you don’t have them, and you’ll miss the best part of this hike.
Food and Water - My notes from our experience below:
Eat a solid breakfast before the hike. It will be early, but you’ll be glad you did. For the hike itself, I packed a full lunch, four energy bars and a large pack of dried fruit. It was the perfect amount.
A standard 3L water bladder isn’t enough for this hike unless you plan on filtering from the river as well. The average H20 consumption level in our group was roughly 4 liters (4L = 1 gal.) per person. There is one stop for tap water about 1 mile from the trailhead at the base of Vernal Fall.
Filtering Water - The Merced River water on the lower half of the hike is safe to drink if you filter it (some people don’t even do that), but access to the river is sporadic above the Nevada Fall area. I’d bring a water filter just in case; either way you’ll be carrying water on the upper half of the hike.
Photography - If you don’t have a quality DSLR camera, find a good friend that does someone and borrow it. Personally I’d bring the heavy zoom lens along with it. It's worthy the extra weight, and you'll have these photos forever. Just do it.
Additional Items - Bring gardening gloves for the cables section plus a baseball hat & sunscreen for the sun exposure.
Day of the Hike - It's an all-day adventure. I'd highly recommend setting off from the trailhead NO LATER than 5am for two really good reasons: 1) beat the crowds 2) beat the heat. Moving at a solid pace, we left right at 5am, spent about an hour-and-half at the top (anything less would have been a shame), and arrived back almost exactly at 4pm.
Unexpected Challenges - Save some energy for the hike down. Reaching the top is exhilarating, especially with the adrenaline of the cables climb, but you'll be overwhelmed by frustration and exhaustion on the way down if you don't manage your expectations and energy levels. Luckily this is all a mental game and 100% controllable. Take a break to calm down after the cables if needed. Keep your mind off the duration of the hike, and keep telling yourself that you have a long trek still ahead of you, even as you get closer to the bottom.
Frequently Asked Questions
You can find Q&A for the Following Questions Here:
How many people have died on Half Dome?
Is the cable route open right now? When is it usually open?
Can I climb/hike Half Dome when the cables are down?
Which route should I take?
Where should I stay the night before I climb Half Dome?
What's Little Yosemite Valley? Do I need a wilderness permit or a reservation to stay there?
Can I camp on Half Dome?
How much do Half Dome permits cost?
Are Half Dome permits transferable?
Where do I go (and when) to enter the lottery for Half Dome permits?
How many permits and dates can I apply for?
How many times can I enter the lottery?
How can I increase my chances of winning the Half Dome permit lottery?
I couldn't get a Half Dome permit. Now what?
Where can I get water along the trail?
Additional Resources
NPS.gov - Half Dome Permits for Day Hikers
YosemiteHikes.com - Half Dome: Everything You Need to Know about Yosemite's Most Demanding Day Hike
Best Hikes North of the Valley + Tuolumne Meadows
North Dome and Indian Rock via Tioga Road
Summary - A moderately challenging out-and-back trek that leads to one of the best views of Yosemite Valley that a hiker could ask for. It starts out fairly flat and even a bit repetitive right off the bat but offers a big payout as you near the end. The short side-trek up to Indian Rock is 100% worth the 20-30 minute detour.
This hike is a great way to avoid the heavy crowds of the valley while enjoying all the benefits of Yosemite’s iconic vistas.
Distance - 9.5 miles round trip (roughly 3.5-4 hrs), which sounds more daunting than it really is.
Elevation Gain - 950 ft.
Seasonal Timing - Spring through fall—whenever Tioga Road is open for the season (during the winter, it closes due to snow coverage).
What to Pack - Definitely pack a lunch, if anything to give you an extra reason to hang out at the viewpoint. On top of all your regular hiking essentials, a high quality camera will be more than worth its weight as well.
Options for Completing the Hike - Feel like adding some adventure? Try the North Dome Loop, a Challenging 18 Mile Day Hike. You can also complete it as a 3 day, 2 night backpacking trip.
Resources
Modern Hiker - North Dome and Indian Rock
Joe’s Guide to Yosemite - North Dome and Indian Rock
NPS.gov - Tioga Road Opening & Closing Dates
Lembert Dome & Dog Lake
Summary - I’d highly recommend this hike if you’re in the Tuolumne Meadows area and looking for a short adventurous day hike. The summit of Lembert Dome is hands-down clear highlight with a stunning 360 degree panorama of the Eastern Sierra mountain range. On a clear weather day, it’s an ideal spot to hang out and enjoy lunch.
Distance - 4.5 miles round trip
Elevation Gain - Roughly 900 ft. of elevation gain on this hike. At a starting point of 8,600 ft., you'll notice the altitude right away.
Seasonal Timing - Spring through fall—whenever Tioga Road is open for the season (during the winter, it closes due to snow coverage).
Unexpected Challenges - High altitude—one person in our group was feeling the effects of altitude sickness. You’ll also want to be mindful of an exposed summit in some areas and variable weather at the top (don’t get caught here during a lightning storm).
Resources
10Adventures - Lembert Dome
HikingWithBarry - Lembert Dome (gotta give Barry some love)
ModernHiker - Dog Lake and Lembert Dome
May Lake & Mt. Hoffmann
Summary - May Lake is one of Yosemite’s most scenic lake hikes, with clear views of Clouds Rest, Half Dome and Tenaya Lake. However the scenery from the top of Mt. Hoffmann is what this hike is really known for, and absolutely worth the extra distance. You’ll be rewarded with a 360 degree view of every major peak in Yosemite, and one of the greatest sights in the park according to the legendary John Muir.
Distance - 2.5 miles round trip to May Lake (1-2 hours); 6.3 miles round trip if you climb Mt. Hoffmann (4-5 hours).
Elevation Gain - 500 ft. to May Lake (8,700 - 9,270 ft.); 2,000 ft. to Mt. Hoffmann (8,700 - 10,845 ft.).
Seasonal Timing - Spring through fall—whenever Tioga Road is open for the season (during the winter, it closes due to snow coverage).
Unexpected Challenges - High altitude. With a starting point of 8,700 ft., this six mile hike will likely feel like ten. If you’re hiking before June or after September, be very mindful of snow on the trail. During all times of the year, be prepared for the exposed summit and variable weather around the peak. As one of the highest points in Yosemite’s High Sierras, you don’t want to be up there if there’s lightning in the forecast.
If you’re climbing to the true summit (marked by a radio antenna), be ready for some serious scrambling, and have your route finding abilities on-point.
Resources
Backpacker.com - Mount Hoffmann and May Lake
10 adventures - Mount Hoffmann
YosemiteHIkes - May Lake & Mount Hoffmann
Cathedral Lakes
Summary - A perfect hike for a group of friends on a beautiful summer day. A well-maintained trail with steady elevation gain to a picturesque swimming lake surrounded by jagged granite cliffs (the photos don’t do it justice). The back end of Lower Cathedral Lake drops off to a stunning view of the Tenaya Lake area below, so bring your camera.
Distance - 7 miles round trip to Lower Cathedral Lake; 8 miles round trip if you include Upper Cathedral Lake (4-5 hours).
Elevation Gain - 790 ft. to Lower Cathedral Lake (8,500 - 9,290 ft.); 1,100 to Upper Cathedral Lake (8,500 - 9,600 ft.)
Seasonal Timing - Spring through fall—whenever Tioga Road is open for the season (during the winter, it closes due to snow coverage). Definitely best during the summer months in my humble opinion.
What to Pack - Pool floaties, music, lunch and trail beer for the lake. Some people might by someone bringing a party to a national park, but that’s just how I like to enjoy a lake. As ALWAYS, leave no trace. Yosemite rangers and visitors do an impressive job of keeping the park clean. I always look for trash to take back with me and don’t think I’ve ever found any.
Stay Safe - Yosemite lakes, on rare occasions, come with a Giardia risk. While most of the hype about this water-borne organism is completely overblown (pardon the pun), I still error on the side of caution. You’re 100% safe to swim and probably ok to drink the water, but just to be safe I always carry a Giardia-rated water filter. Iodine tablets and boiling the water work as well.
Options for Completing the Hike - Crank up the adventure with this 21-mile High Sierra backpacking trip: Cathedral Lakes to Happy Isles via Clouds Rest.
Resources
ModernHiker - Cathedral Lakes
YosemiteHIkes - Cathedral Lakes
Best Hikes South of the Valley + Wawona
Chilnualna Falls - Perfect Sunday Hangout Spot after a Long Hiking Weekend
Looking for a beautiful relaxing spot to hang out and knock back a couple beers on your way out of the park? Check this place out.
Start out on the hiking path for Chilnualna Falls. Less than half a mile down the road, the path splits into an upper path veering up the hill to your left and a lower path continuing below to the right. Stay on the lower path. Continue until the path essentially ends and opens up into a boulder stacked river gorge leading up the hill. Climbing the boulders make for a fun (but not overly risky) scramble up the gorge to a small set of waterfalls flowing into an elevated pool. If you feel like amping up the risk level, a series of bouldering maneuvers will take you up the waterfall for a more thrilling and intimate view of the river than would have been possible on the regular hike.
Like our content?


Come join us on our journey as we continue to build this awesome website!